TestNG is an amazing testing system, an improved variant of JUnit which was being used for quite a while before TestNG appeared. NG means 'People to come'.
TestNG system gives the accompanying highlights −
- Explanations assist us with sorting out the tests without any problem.
- Adaptable test setup.
- Experiments can be gathered all the more without any problem.
- Parallelization of tests can be accomplished utilizing TestNG.
- Backing for information driven testing.
- Inbuilt detailing.
Installing TestNG for Eclipse
Stage 1 − Launch Eclipse and select 'Put in New Software'.
.jpg)
Stage 2 − Enter the URL as 'http://beust.com/overshadowing' and click 'Include'.
.jpg)
Stage 3 − The exchange box 'Include Repository' opens. Enter the name as 'TestNG' and snap 'alright'
.jpg)
Stage 4 − Click 'Select All' and 'TestNG' would be chosen as appeared in the figure.
.jpg)
Stage 5 − Click 'Close' to proceed.
.jpg)
Stage 6 − Review the things that are chosen and snap 'Next'.
.jpg)
Stage 7 − "Acknowledge the License Agreement" and snap 'Finish'.
.jpg)
Stage 8 − TestNG begins introducing and the advancement would be demonstrated follows.
.jpg)
Stage 9 − Security Warning springs up as the legitimacy of the product can't be set up. Snap 'alright'.
.jpg)
Stage 10 − The Installer prompts to restart Eclipse for the progressions to produce results. Snap 'Yes'.
.jpg)
Annotations in TestNG
Comments were officially added to the Java language in JDK 5 and TestNG settled on the decision to utilize explanations to explain test classes. Following are a portion of the advantages of utilizing explanations. Progressively about TestNG can be found here
- TestNG recognizes the strategies it is keen on by looking into explanations. Subsequently, technique names are not confined to any example or organization.
- We can pass extra parameters to comments.
- Comments are specifically, so the compiler will signal any missteps immediately.
- Test classes no longer need to broaden anything, (for example, TestCase, for JUnit 3).
| Sr.No. | Annotation & Description |
|---|---|
| 1 |
@BeforeSuite The annotated method will be run only once before all the tests in this suite have run. |
| 2 |
@AfterSuite The annotated method will be run only once after all the tests in this suite have run. |
| 3 |
@BeforeClass The annotated method will be run only once before the first test method in the current class is invoked. |
| 4 |
@AfterClass The annotated method will be run only once after all the test methods in the current class have run. |
| 5 |
@BeforeTest The annotated method will be run before any test method belonging to the classes inside the <test> tag is run. |
| 6 |
@AfterTest The annotated method will be run after all the test methods belonging to the classes inside the <test> tag have run. |
| 7 |
@BeforeGroups The list of groups that this configuration method will run before. This method is guaranteed to run shortly before the first test method that belongs to any of these groups is invoked. |
| 8 |
@AfterGroups The list of groups that this configuration method will run after. This method is guaranteed to run shortly after the last test method that belongs to any of these groups is invoked. |
| 9 |
@BeforeMethod The annotated method will be run before each test method. |
| 10 |
@AfterMethod The annotated method will be run after each test method. |
| 11 |
@DataProvider Marks a method as supplying data for a test method. The annotated method must return an Object[ ][ ] where each Object[ ] can be assigned the parameter list of the test method. The @Test method that wants to receive data from this DataProvider needs to use a dataProvider name equals to the name of this annotation. |
| 12 |
@Factory Marks a method as a factory that returns objects that will be used by TestNG as Test classes. The method must return Object[ ]. |
| 13 |
@Listeners Defines listeners on a test class. |
| 14 |
@Parameters Describes how to pass parameters to a @Test method. |
| 15 |
@Test Marks a class or a method as part of the test. |
TestNG-Eclipse Setup
Stage 1 − Launch Eclipse and make 'Another Java Project' as demonstrated as follows.
.jpg)
Stage 2 − Enter the venture name and snap 'Next'.
.jpg)
Stage 3 − Navigate to "Libraries" Tab and Add the Selenium Remote Control Server JAR document by tapping on "Include External JAR's" as demonstrated as follows.
.jpg)
Stage 4 − The additional JAR document is appeared here. Snap 'Include Library'.
.jpg)
Stage 5 − The 'Include Library' discourse opens. Select 'TestNG' and snap 'Next' in the 'Include Library' exchange box.
.jpg)
Stage 6 − The additional 'TestNG' Library is included and it is shown as demonstrated as follows.
.jpg)
Stage 7 − Upon making the undertaking, the structure of the task would be as demonstrated as follows.
.jpg)
Stage 8 − Right-click on 'src' organizer and select New >> Other.
.jpg)
Stage 9 − Select 'TestNG' and snap 'Next'.
.jpg)
Stage 10 − Select the 'Source Folder' name and snap 'alright'.
.jpg)
Stage 11 − Select the 'Bundle name', the 'class name', and snap 'Finish'.
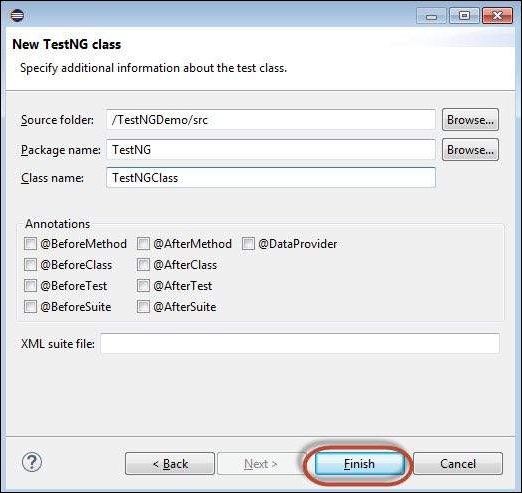
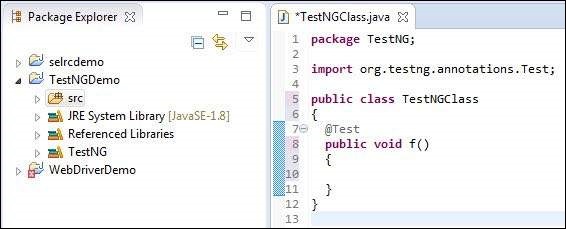
Stage 12 − The Package adventurer and the made class would be shown.
First Test in TestNG
Presently let us begin scripting utilizing TestNG. Let us content for a similar model that we utilized for understanding the WebDriver. We will utilize the demo application, www.calculator.net, and perform percent number cruncher.
In the accompanying test, you will see that there is NO principle strategy, as testNG will drive the program execution stream. Subsequent to introducing the driver, it will execute the '@BeforeTest' technique followed by '@Test' and afterward '@AfterTest'. If it's not too much trouble note that there can be any number of '@Test' explanation in a class yet '@BeforeTest' and '@AfterTest' can show up just a single time.
package TestNG;

import java.util.concurrent.TimeUnit;

import org.openqa.selenium.*;
import org.openqa.selenium.firefox.FirefoxDriver;

import org.testng.annotations.AfterTest;
import org.testng.annotations.BeforeTest;
import org.testng.annotations.Test;

public class TestNGClass {
   WebDriver driver = new FirefoxDriver();

   @BeforeTest
   public void launchapp() {
      // Puts an Implicit wait, Will wait for 10 seconds before throwing exception
      driver.manage().timeouts().implicitlyWait(10, TimeUnit.SECONDS);

      // Launch website
      driver.navigate().to("http://www.calculator.net");
      driver.manage().window().maximize();
   }

   @Test
   public void calculatepercent() {
      // Click on Math Calculators
      driver.findElement(By.xpath(".//*[@id='menu']/div[3]/a")).click();

      // Click on Percent Calculators
      driver.findElement(By.xpath(".//*[@id='menu']/div[4]/div[3]/a")).click();

      // Enter value 10 in the first number of the percent Calculator
      driver.findElement(By.id("cpar1")).sendKeys("10");

      // Enter value 50 in the second number of the percent Calculator
      driver.findElement(By.id("cpar2")).sendKeys("50");

      // Click Calculate Button
      driver.findElement(By.xpath(".//*[@id='content']/table/tbody/tr/td[2]/input")).click();

      // Get the Result Text based on its xpath
      String result =
         driver.findElement(By.xpath(".//*[@id='content']/p[2]/span/font/b")).getText();

      // Print a Log In message to the screen
      System.out.println(" The Result is " + result);

      if(result.equals("5")) {
         System.out.println(" The Result is Pass");
      } else {
         System.out.println(" The Result is Fail");
      }
   }

   @AfterTest
   public void terminatetest() {
      driver.close();
   }
}
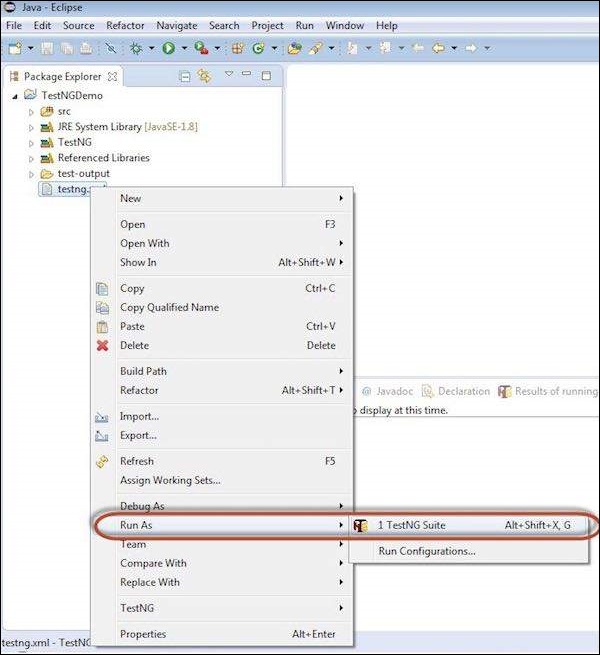
Execution
To execute, right snap on the made XML and select "Run As" >> "TestNG Suite"
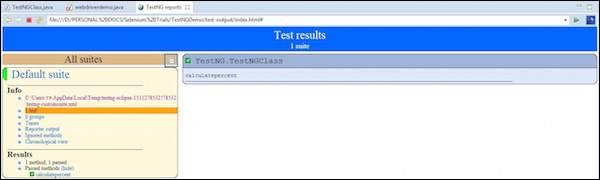
Result Analysis
The yield is tossed to the comfort and it would show up as demonstrated as follows. The comfort yield likewise has an execution synopsis.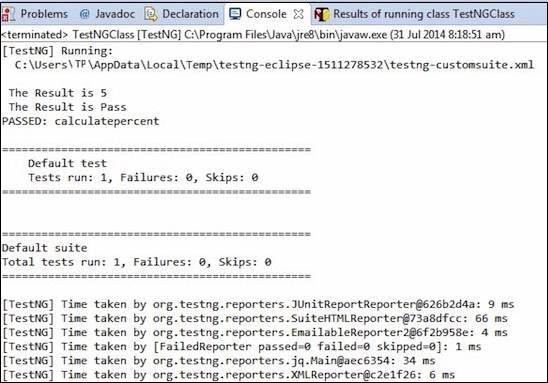 The aftereffect of TestNG can likewise be found in an alternate tab. Snap on 'HTML Report View' button as demonstrated as follows.

The HTML result would be shown as demonstrated as follows.